단일 영화 상세 정보 가져오기
async searchMovieWithId({state, commit}, payload) {
    if(this.state.loading) return

    commit('updateState', {
      theMovie: {},
      loading: true
    })

    try {
      const result = await _fetchMovie(payload)
      commit('updateState', {
        theMovie: result.data
      })
    }  catch(error) {
      commit('updateState', {
        theMovie: {}
      })
    } finally {
      commit('updateState', {
        loading : false
      })
    }
  }
movie.js파일 actions부분에 searchMovieWithId메소드 추가합니다.
actions는 비동기로 실행하니 async를 사용했습니다.
이전 searchMovies와 유사한 부분은 그대로 사용하고 _fetchMovie부분을 수정해야 합니다.
주의해야할 것은 state부분에 theMovie를 명시한 적이 없습니다. 여기서 theMovie: {}를 알려줘야 합니다.

기존에 검색할 때는 title, type, year등 변수를 사용했지만, 단일 영화는 id값으로 검색할 겁니다.
그래서 id값이 있으면 ${id}부분 url를 검색하고 없으면 기존대로 검색하는 방식대로 작성했습니다.
routes 부분을 수정합니다.

routes폴더 안에 index.js에서 movie페이지는 뒤에 id를 통해 개별 영화를 검색할 수 있도록 작업합니다.
여기서 id를 Movie.vue와 일치해야 됩니다.
<script>
export default {
  created() {
    this.$store.dispatch('movie/searchMovieWithId', {
      id: this.$route.params.id
    })
  }
}
</script>
routes폴더 안에 Movie.vue의 script부분입니다.
movie모듈의 actions 안에 searchMovieWithId메소드를 사용할 예정이니 dispatch메소드를 사용했습니다.
id도 명시해줬습니다.
스켈레톤 UI
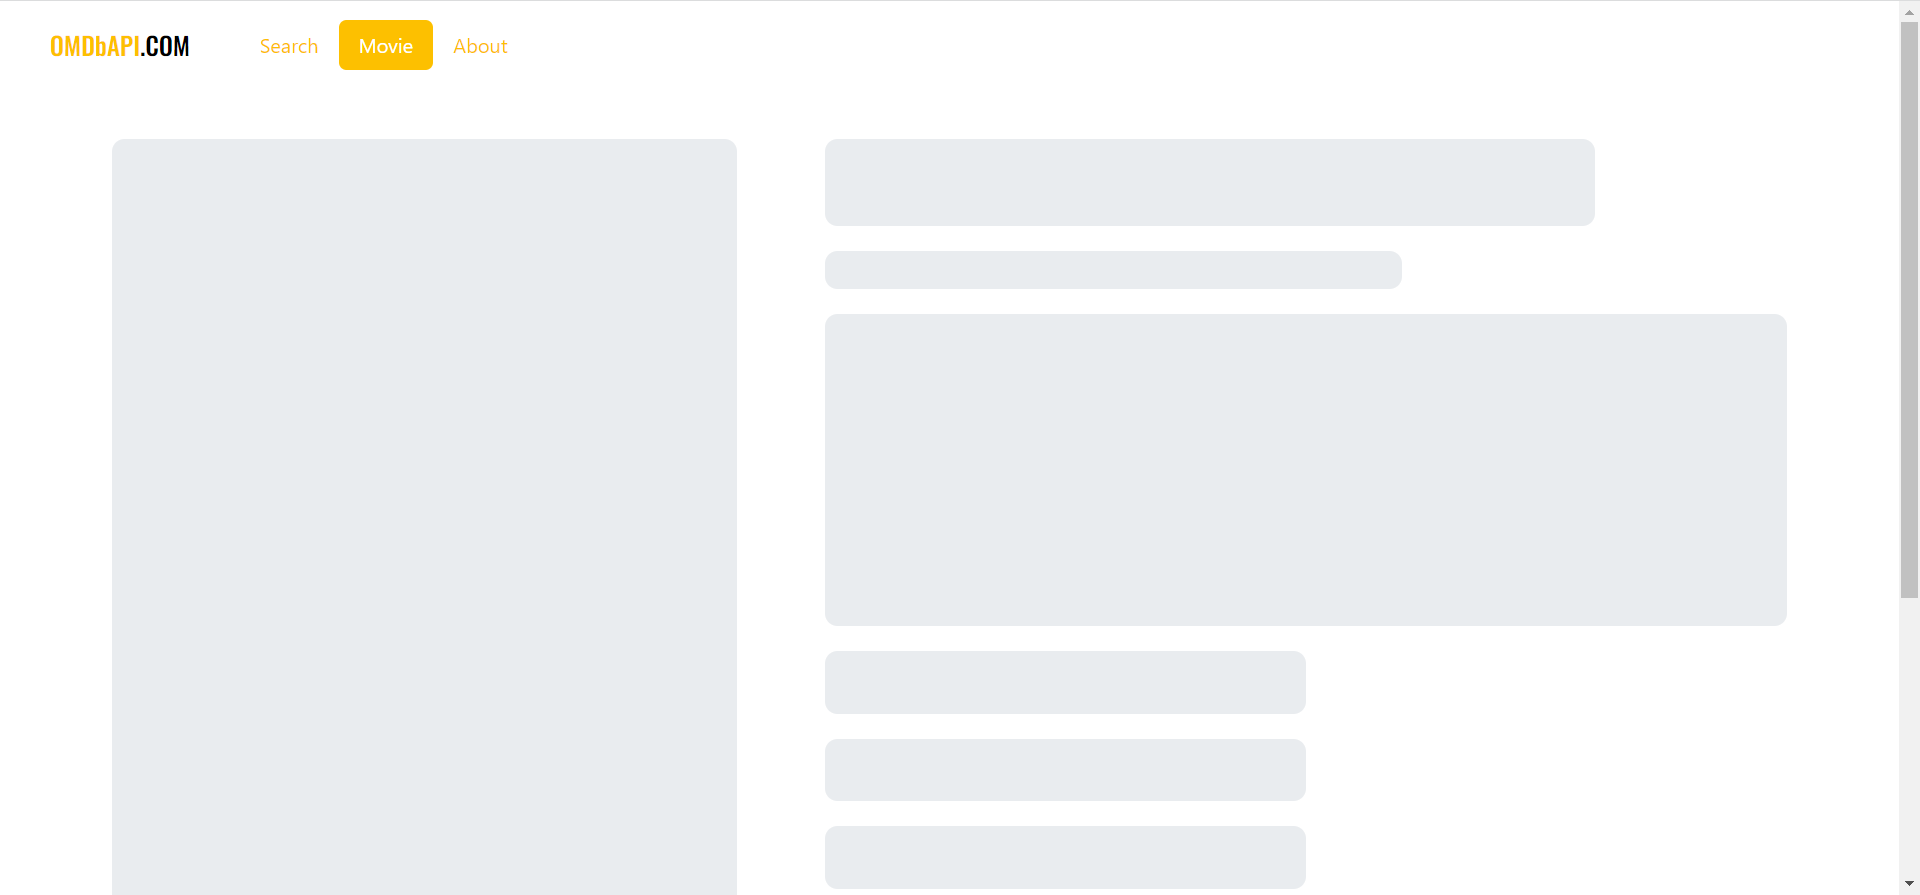
영화 검색후, 영화 상세 페이지로 이동될 때 우선 뼈대 UI를 보여주고 내용을 보여줍니다.
여기서 뼈대 UI가 스켈레톤UI라고 불립니다.
<template>
  <div class="container">
    <div class="skeletons">
      <div class="skeleton poster"></div>
      <div class="specs">
        <div class="skeleton title"></div>
        <div class="skeleton spec"></div>
        <div class="skeleton plot"></div>
        <div class="skeleton etc"></div>
        <div class="skeleton etc"></div>
        <div class="skeleton etc"></div>
      </div>
    </div>
  </div>
</template>
Movie.vue의 template입니다.
<style lang="scss" scoped>
@import "~/scss/main";
.container {
  padding-top: 40px;
}
.skeletons{
  display: flex;
  .poster {
    flex-shrink: 0;
    width: 500px;
    height: 500px * 3 / 2;
    margin-right: 70px;
  }
  .specs {
    flex-grow: 1;
  }
  .skeleton {
    border-radius: 10px;
    background-color: $gray-200;
    &.title {
      width: 80%;
      height: 70px;
    }
    &.spec {
      width: 60%;
      height: 30px;
      margin-top: 20px;
    }
    &.plot {
      width: 100%;
      height: 250px;
      margin-top: 20px;
    }
    &.etc {
      width: 50%;
      height: 50px;
      margin-top: 20px;
    }
  }
}
</style>
Movie.vue의 style입니다.
poster은 브라우저가 축소되던 확대되던 비율을 유지해야함으로 flex-shrink를 0으로 설정했습니다.
specs의 자식요소들의 너비가 %로 지정해서 보이기 위해 specs에 felx-grow을 1로 설정했습니다.
Loader
상세 내용이 나타나기 전에 loading 애니메이션을 추가할 겁니다.
앞서 MovieList.vue에서도 나왔습니다. 앞으로도 여러 곳에서 사용할 것으로 판단되어 component로 만들어서 관리합니다.
<template>
  <div
    :style="{width: `${size}rem`, height: `${size}rem`, zIndex}"
    :class="{absolute, fixed}"
    class="spinner-border text-primary"></div>
</template>

<script>
export default {
  props: {
    size: {
      type: Number,
      default: 2
    },
    absolute: {
      type: Boolean,
      default: false
    },
    fixed: {
      type: Boolean,
      default: false
    },
    zIndex: {
      type: Number,
      default: 0
    }
  }
}
</script>

<style lang="scss" scoped>
.spinner-border {
  margin: auto;
  top: 0;
  bottom: 0;
  left: 0;
  right: 0;
  &.absolute {
    position: absolute;
  }
  &.fixed {
    position: fixed;
  }
}
</style>
components폴더 안에 Loader.vue를 만듭니다.
MovieList.vue에 있는 div를 제거하고 Loader 컴포넌트를 넣습니다. (코드 캡처 안 하겠습니다.)
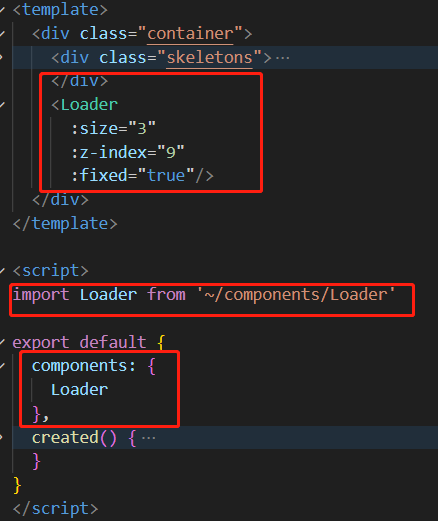
Movie.vue에 Loader를 추가합니다.
영화 상세페이지 가운데에 나타나려고 구상해서 size도 좀 크고,
기타 요소들보다 위에 있고, 가운데로 고정으로 나타나려고 만들었습니다.
영화 상세 페이지 정리

Movie.vue파일의 .container 안에 부분을 수정 및 추가하는 내용입니다.
방금 스켈러톤UI와 loading 부분을 template으로 다시 감싸서 v-if로 loading값이 true면 작동되는 구조로 수정했습니다.
loading값이 false면 v-else로 movie-details를 보여줍니다.

위에서 loading값 필요해서 Movie.vue파일의 script에 computed에 loading을 추가했습니다.
.movie-details {
  display: flex;
  color: $gray-600;
  .poster {
    flex-shrink: 0;
    width: 500px;
    height: 500px * 3 / 2;
    margin-right: 70px;
    border-radius: 10px;
    background-color: $gray-200;
    background-size: cover;
    background-position: center;
  }
  .specs {
    flex-grow: 1;
    .title {
      color: $black;
      font-family: 'Oswald', sans-serif;
      font-size: 70px;
      line-height: 1;
      margin-bottom: 30px;
    }
    .labels {
      color: $primary;
      span {
        &::after {
          content: "\00b7";
          margin: 0 6px;
        }
        &:last-child::after {
          display: none;
        }
      }
    }
    .plot {
      margin-top: 20px;
    }
    .ratings {

    }
    h3 {
      margin: 24px 0 6px;
      color: $black;
      font-family: 'Oswald', sans-serif;
      font-size: 20px;
    }
  }
}
Movie.vue파일의 style에서 추가되는 부분입니다.
이 중 labels부분 각 span 가운데에 ·(middot)을 추가하려합니다.
여기서는 escaped unicode를 사용해야만 작성이 됩니다.
Ratings 데이터 출력
<div class="ratings">
  <h3>Ratings</h3>
  <div class="rating-wrap">
    <div
      v-for="{Source:name, Value:score} in theMovie.Ratings"
      :key="name"
      :title="name"
      class="rating">
      <img
      :src="`https://github.com/ParkYoungWoong/vue3-movie-app/blob/master/src/assets/${name}.png?raw=true`"
      :alt="name" />
      <span>{{ score }}</span>
    </div>
  </div>
</div>
Movie.vue파일 ratings의 template입니다.
.ratings {
  .rating-wrap {
    display: flex;
    .rating {
      display: flex;
      align-items: center;
      margin-right: 32px;
      img {
        height: 30px;
        flex-shrink: 0;
        margin-right: 6px;
      }
    }
  }
}
Movie.vue파일 ratings의 style입니다.
높은 해상도의 포스터 가져오기
특정 이미지는 링크 뒤에 픽셀정보 나옵니다. 해당 정보를 수정함과 동시에 해상도를 높이거나 낮출 수 있습니다.
<div
  :style="{backgroundImage:`url(${requiestDiffSizeImage(theMovie.Poster)})`}"
  class="poster"></div>
Movie.vue의 poster부분 url를 수정했습니다.
methods: {
  requiestDiffSizeImage(url, size = 700) {
    return url.replace('SX300', `SX${size}`)
  }
}
Movie.vue의 script부분에 methods를 추가합니다.
imdb에서 poster url 뒤부분SX300 숫자 부분을 올리면 해상도가 높은 이미지를 반환할 수 있는 특징으 ㄹ이용했습니다.
모든 이미지는 다 이런 방식으로 처리할 수 없습니다.
url등 특징을 확인 후 test하고 실행하시면 됩니다.
'배워서 따라하는 포플 > 영화 검색 사이트' 카테고리의 다른 글
| About, 404 Page not found (0) | 2023.08.29 |
|---|---|
| 영화 포스트 로드 이벤트, 예외처리, Nav 경로 일치 및 활성화 (0) | 2023.08.28 |
| Container 사용자 지정, 에러 메시지 출력, 로딩 애니메이션, Footer (0) | 2023.08.28 |
| 영화 아이템 - 기본 출력, 텍스트 말줄임와 배경 흐림 (0) | 2023.08.27 |
| 영화 검색 - 기본 검색, 추가 요청, ID중복 제거, 리팩토링 (0) | 2023.08.25 |


