Sprites 가져오기

DetailPage의 index.jsx에서 pokemonData중 sprites 데이터를 불러옵니다.
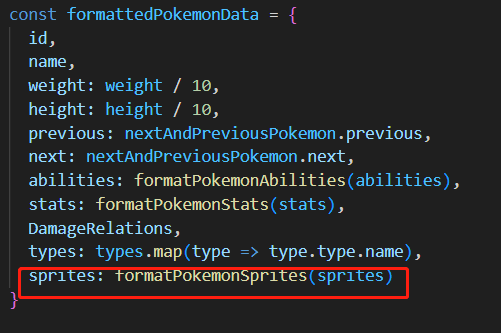
해당 데이터들을 정리하겠습니다.
const formatPokemonSprites = (sprites) => {
    const newSprites = {...sprites}

    Object.keys(newSprites).forEach(key => {
      if(typeof newSprites[key] !== 'string') {
        delete newSprites[key]
      }
    })

    return Object.values(newSprites)
  }
기존에 있는 데이터 손상하지 않게 새로운 배열을 만들겠습니다.
<div className="flex my-8 flex-wrap justify-center">
    {pokemon.sprites.map((url,index) => (
      <img key={index} src={url} alt='sprite' />
    ))}
</div>
html부분에 보여주게 합니다.
Description 가져오기

DetailPage의 index.jsx에서 formattedPokemonData에 description 추가합니다.
const getPokemonDescription = async (id) => {
    const url =`https://pokeapi.co/api/v2/pokemon-species/${id}/`

    const {data: pokemonSpecies} = await axios.get(url)

    const descriptions = filterAndFormatDescription(pokemonSpecies.flavor_text_entries)

    return descriptions[Math.floor(Math.random() * descriptions.length)]
}
getPokemonDescription 함수입니다.
해당 url에서 데이터를 불러오고 filterAndFormatDescription함수를 사용합니다.
그리고 descriptions배열 중 random으로 하나를 뽑아 옵니다.
const filterAndFormatDescription = (flavorText) => {
    const koreanDescriptions = flavorText
      ?.filter((text) => text.language.name === "ko")
      .map((text) => text.flavor_text.replace(/\r|\n|\f/g, ' '))

    return koreanDescriptions
}
filterAndFormatDescription함수입니다.
한국어로 된 내용만 뽑아오고 이상한 문자열을 모두 빈칸으로 대체합니다.
<h2 className={`text-base font-semibold ${text}`}>
	설명
</h2>
<p className='text-md leading-4 font-sans text-zinc-200 max-w-[30rem] text-center'>
	{pokemon.description}
</p>
UI입니다.
버그 수정하기

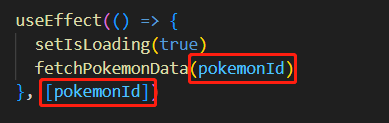
화살표 클릭 시 링크는 변경했지만 화면이 렌더링 안 됩니다.
그래서 useEffect에서 pokemonId 값을 넣어서 변경될 때마다 렌더링을 지시했습니다.
또한 화면 렌더링 시간이 길어졌을 때 로딩을 넣어려고 처음엔 false값을 주며 useEffect에서 true값을 줍니다.
'배워서 따라하는 포플 > 포켓몬 도감 앱' 카테고리의 다른 글
| 타입스크립트로 변경하기(1) (0) | 2023.09.18 |
|---|---|
| 로그인 페이지 생성하기 (0) | 2023.09.17 |
| 상세 페이지 생성하기(2) - Damage Relations (0) | 2023.09.16 |
| 상세 페이지 생성하기(1) (0) | 2023.09.14 |
| 메인 페이지 생성하기 (0) | 2023.09.09 |


